จากบทความ Mach3 กับ Serial Port การใช้ Serial Communication ได้ในสถานะ ส่งข้อมูลจาก Mach3 ออกมา ในทางกลับกัน เราก็มีความต้องการที่จะส่งคำสั่งเพื่อคุม Mach3 เช่นกัน เช่น ปุ่มคำสั่งต่าง ๆ Start,Stop,LimitSwitch เป็นต้น ช่องทางเดิมคือช่อง Printer หรือ Parallel Port แต่ช่อง Parallel Port ดังกล่าวมีข้อจำกัดคือ ปริมาณ I/O ไม่เพียงพอกับความต้องการใช้งาน ใน Mach3 มีช่องทางที่รองรับอีกช่องทางคือ MOD BUS คุณสามารถหาความรู้เพิ่มเติม ได้ตาม Link นี้ครับ
ในที่นี้จะกล่าวถึงการติดตั้ง Modbus พื้นฐานสำหรับ Mach3 ด้วย Arduino ศึกษาเพิ่มเติมได้จาก Link เดิมนี้ครับ
การเตรียมการทดลอง
1.Mach3 CNC Controller
2.Arduino Board (UNO,Nano)
3.Arduino IDE
4.อุปกรณ์ประกอบอิเลคทรอนิคส์ เช่น สายเชื่อมสัญญาน
5.Software Serial Monitor
6.Software Modbus Tester
ขั้นตอนทดลอง
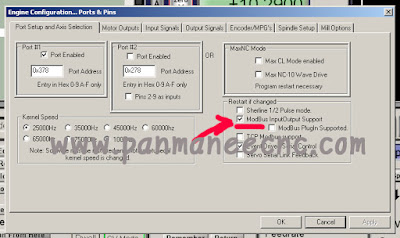
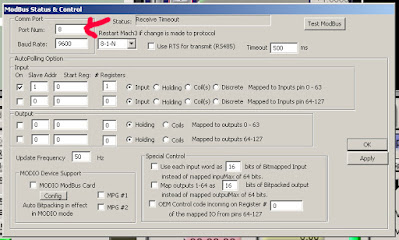
1.Setup Mach3 Modbus

2. Upload firmware To Arduino
Code:
int pin = 2; //Cycle Start button
int in_buffer[8]; // receiving buffer
int reply_1[] ={0x01, 0x04, 0x02, 0x00, 0x01, 0x78, 0xF0};
int reply_0[] ={0x01, 0x04, 0x02, 0x00, 0x00, 0xB9, 0x30};
void setup()
{
Serial.begin(9600); // Init serial communication
pinMode(pin, INPUT); // Set pin to input
digitalWrite(pin, HIGH); // Turn on pullup resistor
}
void loop()
{
if ( Serial.available() == 8 ) {
// read ModBus command from Mach3
// in this example we only read, don't check anything
for (int i=0; i < 8; i++) in_buffer[ i ] = Serial.read();
// Read Input PIN and reply with 0 or 1
// Reply is inverted because PIN default state is HIGH and we connect to GND
if ( digitalRead(2) == 0 )
for (int i=0; i < 7; i++) Serial.write(reply_1[ i ]);
else
for (int i=0; i < 7; i++) Serial.write(reply_0[ i] );
}
}
3. Run "Modbus Serial Tester" เพื่อทำการทดสอบ Modbus Firmware Connect Serialport ตามที่ Board Arduino ได้ Configure ใว้ใน Computer กำหนด ความเร็วรับส่ง ที่ 9600 ใส่ค่า 01 04 00 00 00 01ลงในช่อง แล้วกด Send จากนั้น ทำการ connect PIN2 Arduino กับ GND 01 04 00 00 00 01ลงในช่อง แล้วกด Send อีกครั้ง จะเห็นการเปลี่ยนแปลงตามรูป


ในที่นี้จะกล่าวถึงการติดตั้ง Modbus พื้นฐานสำหรับ Mach3 ด้วย Arduino ศึกษาเพิ่มเติมได้จาก Link เดิมนี้ครับ
การเตรียมการทดลอง
1.Mach3 CNC Controller
2.Arduino Board (UNO,Nano)
3.Arduino IDE
4.อุปกรณ์ประกอบอิเลคทรอนิคส์ เช่น สายเชื่อมสัญญาน
5.Software Serial Monitor
6.Software Modbus Tester
ขั้นตอนทดลอง
1.Setup Mach3 Modbus


2. Upload firmware To Arduino
Code:
int pin = 2; //Cycle Start button
int in_buffer[8]; // receiving buffer
int reply_1[] ={0x01, 0x04, 0x02, 0x00, 0x01, 0x78, 0xF0};
int reply_0[] ={0x01, 0x04, 0x02, 0x00, 0x00, 0xB9, 0x30};
void setup()
{
Serial.begin(9600); // Init serial communication
pinMode(pin, INPUT); // Set pin to input
digitalWrite(pin, HIGH); // Turn on pullup resistor
}
void loop()
{
if ( Serial.available() == 8 ) {
// read ModBus command from Mach3
// in this example we only read, don't check anything
for (int i=0; i < 8; i++) in_buffer[ i ] = Serial.read();
// Read Input PIN and reply with 0 or 1
// Reply is inverted because PIN default state is HIGH and we connect to GND
if ( digitalRead(2) == 0 )
for (int i=0; i < 7; i++) Serial.write(reply_1[ i ]);
else
for (int i=0; i < 7; i++) Serial.write(reply_0[ i] );
}
}
3. Run "Modbus Serial Tester" เพื่อทำการทดสอบ Modbus Firmware Connect Serialport ตามที่ Board Arduino ได้ Configure ใว้ใน Computer กำหนด ความเร็วรับส่ง ที่ 9600 ใส่ค่า 01 04 00 00 00 01ลงในช่อง แล้วกด Send จากนั้น ทำการ connect PIN2 Arduino กับ GND 01 04 00 00 00 01ลงในช่อง แล้วกด Send อีกครั้ง จะเห็นการเปลี่ยนแปลงตามรูป
Credit : https://www.buildlog.net/blog/2011/02/modbus-arduino-mach3-and-brains-oh-my/

4.ทดสอบการใช้ Modbus "สร้าง Brain กดปุ่ม Cycle Start"
4.1. ปิดโปรแกรม สื่อสาร Comport ทั้งหมด.
4.2. Run Mach3 only และ open Brain editor. Click on '+', go to ModBus และกำหนดตามล่างนี้

Save file to Mach3\Brains 'Cycle_Start_button.brn'.
ไปที่ Brian control, click 'ReloadAll', enable ต่อไปคือ 'ViewBrain'.
การทดสอบ
ขณะที PIN2 Arduinoลอย จะเห็น Input เป็น 0. หาก connect to GND Input จะเป็น 1.


Input ที่คุณเห็นสามารถติดต่อกับ ทุก function ใน Mach3.
ตัวอย่างนี้เพื่อทดสอบปุ่ม Cycle Start
กลับไปที่ Brain editor, mark Input และ '+' เพี่อเพิ่ม Input
ทำการ mark อีกครั้งและไปที่ Mach3 function '1000- CycleStart' ตามภาพ

Save Brain และ Reload

รายละเอียดเพิ่มเติม ตาม Linkนี้ครับ https://www.machsupport.com/forum/index.php?topic=23759.0
ความคิดเห็น
แสดงความคิดเห็น